
31 December 2008
29 December 2008
"Blown Away"
In 2001 or so, new to the internet, I joined AlternativeQuiltList, a yahoogroup. This was in the good old days when there was lots of discussion in the discussion groups - that sphere of action now seems to have been taken over by blogs, which has its pros and cons.
Anyway, AQL had a "painting challenge" where you chose an artist and wrote a bit about them on the list, then made a quilt based on their work or something that arose from your research. My choice for the first round was Elisabeth Vigee Lebrun, who painted aristocrats around the time of the French Revolution. More about her another time (maybe).
For the second round I wanted something completely different - so, why not Australian Aboriginal art? I chanced on an online photo of a "desert garden" on the Art and Australia magazine site. It's no longer there, but looked rather like this -

and turned out to be by an artist named Gloria Petyarre. I loved the flow of the shapes, and did a sample, and then pulled out all sorts of yellow, orange, red, brown fabrics, and it evolved into quite a large piece (44 cm x 100 cm).
Each of the seven sections has a different combination of colours. The "leaves" are about the size of a thumbnail, built up in layers to cover the background, and then the different sections are applied to a piece of black fabric - Here are a couple of details -
 More recently, Gloria Petyarre has been painting Bush Medicine Dreaming -

 Here are a couple of details - More recently, Gloria Petyarre has been painting Bush Medicine Dreaming -
 28 December 2008
Going to the seaside
On Xmas day we make some sandwiches, hop in the car, and head to the coast. Whizzing past trees, this year in unexpected sunshine - we found ourself in the New Forest, famous for its wild ponies -
 which appear around every corner, it seems (and are very photogenic!)
we found ourself in the New Forest, famous for its wild ponies - which appear around every corner, it seems (and are very photogenic!)
 Driving through Beaulieu and finding Bucklers Hard historic village closed (well, it would be, on xmas day) we followed the sign to St Leonards, which wasn't on our map. And this huge wall appeared --
Turns out this is the biggest medieval barn in England, 210 feet by 70 feet. Modern barns are small in comparison.  Note the clouds moving in from the chilly east.
 Note the clouds moving in from the chilly east.
Soon, a glimpse of the sea - or estuary at least - at Lymington -


and a spot to eat our picnic lunch (the sign doesn't specify "no picnicking") - Ever westward we travelled, turning at the sign for Hurst Castle.
 Beyond the floodgates and saltmarsh, the hills are actually the Isle of Wight -
 Ah yes the saltmarsh - catching the sun as it broke through the clouds -
 We got out for a brisk walk on Hurst Spit
 to find a streak of sunset beyond the rocks -
 124,000 tons of rock had been brought over from Norway to shore up the coastline, along with 300,000 cubic metres of shingle.

 Ever westward we travelled, turning at the sign for Hurst Castle. Beyond the floodgates and saltmarsh, the hills are actually the Isle of Wight -
 Ah yes the saltmarsh - catching the sun as it broke through the clouds -
 We got out for a brisk walk on Hurst Spit to find a streak of sunset beyond the rocks - 124,000 tons of rock had been brought over from Norway to shore up the coastline, along with 300,000 cubic metres of shingle.
 27 December 2008
Thank you, Santa!
 Ah, the instructions are in Japanese ...
 ... but they have pictures, and there's apparently a website in English ...
25 December 2008
seasonal greetings
Happy holidays "to one and all" - may the blogfairy be good to you and yours.
 This year - as in 1988 above - "the twirly thing" is out on the table, surrounded by pinecones.
 This year - as in 1988 above - "the twirly thing" is out on the table, surrounded by pinecones.
 An extravagant purchase in my library-school days of 1981, it continues to delight, and has seen xmas in Halifax, Oxford, Sparsholt Rd N19, and now Stroud Green Rd N4.
24 December 2008
23 December 2008
Yappy dog quiltlet
This is unashamedly foundation piecing (called paper piecing in the US). To avoid having to take out the foundation and unpick all those fiddly bits of paper that get left in the seams, I used fabric as the foundation.
But first I needed a pattern - so I made it by folding a piece of paper -
 Then I folded my fabric to get four layers, laid the paper pattern on top, and punched through at the intersections of lines with a pointy awl. (Put an old phone book or the Sunday paper underneath!) You can just about see the dots (mirror image) in the bottom, and how they joined up on top.
 Here are the four foundations, ready to be cut apart -
 To help me remember which piece goes on next, I numbered each "row" -
 and then cut the block into those rows -
 ok, it's ready to add fabric. Note that the fabric is upside down - so you can see the stitching lines drawn on the front, the fabric gets sewn on the back. (I used a Sharpie and it went right through the foundation fabric.)
  Here the second piece, stitched along the seam line - I'm trying to cut it a bit larger than its finished size. Don't do this - there's a better way....
 The better way is to sew along the seam line marked on the fabric, then turn the piece over, check that the new piece will actually cover the backing, then unfold it and
 trim the seam neatly -
 After sewing each row, sew the rows together -
 It's had the "pillowcase" treatment and now needs a bit of quilting.
But first I needed a pattern - so I made it by folding a piece of paper -
 Then I folded my fabric to get four layers, laid the paper pattern on top, and punched through at the intersections of lines with a pointy awl. (Put an old phone book or the Sunday paper underneath!) You can just about see the dots (mirror image) in the bottom, and how they joined up on top.
 Here are the four foundations, ready to be cut apart -
 To help me remember which piece goes on next, I numbered each "row" -
 and then cut the block into those rows -
 ok, it's ready to add fabric. Note that the fabric is upside down - so you can see the stitching lines drawn on the front, the fabric gets sewn on the back. (I used a Sharpie and it went right through the foundation fabric.)
 The first piece in each strip will be covered by the next piece. They don't have to be cut to size before sewing - in fact it's preferable to use a larger piece and cut it back once you know it fits!
 Here the second piece, stitched along the seam line - I'm trying to cut it a bit larger than its finished size. Don't do this - there's a better way....
 The better way is to sew along the seam line marked on the fabric, then turn the piece over, check that the new piece will actually cover the backing, then unfold it and
 trim the seam neatly -
 After sewing each row, sew the rows together -
Some borders make this into an A4-sized Little Gem
 It's had the "pillowcase" treatment and now needs a bit of quilting.
22 December 2008
More thorns
Having fun! When you have the paint out, you might was well use it up -
 A bit of fussy cutting -- and you never know what else you might find to go with it (this is paintsticks on some lining fabric) -
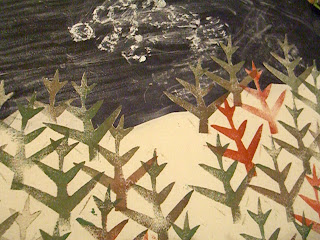 Next, threads for a bit of thread painting, or just quilting ... don't know yet -
though I have various ideas about what I could have done before starting the printing. "Next time" ... a few ideas can make a leftover into a series ...
 A bit of fussy cutting -- and you never know what else you might find to go with it (this is paintsticks on some lining fabric) -
 Next, threads for a bit of thread painting, or just quilting ... don't know yet -
 though I have various ideas about what I could have done before starting the printing. "Next time" ... a few ideas can make a leftover into a series ...
"Thorns in their side"
The fabrics are printed with one of my favourite stamps, cut out of sticky-back foam - the paints are Liquitex and an irridescent acrylic, which works well on dark fabric -
 The quilting emphasises the spiky outlines and adds some colour in the grey area.
  The red bits on the bottom are printed on interfacing, or maybe it was a bit of lutradur, and appliqued.
 The quilting emphasises the spiky outlines and adds some colour in the grey area. The red bits on the bottom are printed on interfacing, or maybe it was a bit of lutradur, and appliqued.
21 December 2008
Sawtooth cats
 These are both A4 size (about 8 1/2" x 11") and consist of piecing and fusing (though you could use straightforward applique instead of fusing). Here's how to make them.
First, the one on the left - with its fat tail. Draw out the pattern on a sheet of letter paper, as shown. I used plates to get smooth circles; with a compass, it's easier to get the right size. Don't worry about spacing the triangles - there's an easy way to do that later. (The fabric scraps indicate some "naturalistic" colourways.)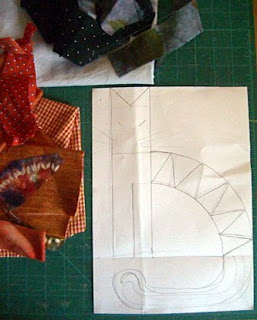
Cut the pattern into pieces. For the zigzags, fold the arc in half, then in thirds, and use those fold lines to get the size of the triangles (see below). I made little cuts and later discovered that they aren't needed. And you can also ignore the extra triangular bit on the tail - just cut the tail straight across at the top.
My pattern has notes about what fabrics to use for which piece, and the order of putting it together. As the method combines fusing (raw edge applique) and piecing, it's useful to write on the pattern where additional fabric for seams is needed.
The fused bits are the triangles that go on the arc, the ears, and the tail.
 Now cut out the pieces. You can use the paper as a template to iron the curves into place.
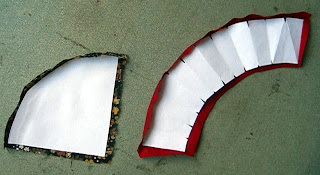
Then iron some bondaweb or other fusible to the 6 triangle pieces and the tail (or fuse the fabric before you cut it out). Here I did the ears as separate pieces, but you can cut them all-in-one with the body and just put fusible under the ear part, then fuse them onto a square instead of the triangular bit. (Clear as mud?)
To help the tail "join" to the cat, I cut a small triangle in the tail fabric and fused that down too. (The original idea of having that triangle as part of the tail was impractical.) Then I stitched round the fused edges - but you can wait to do this as part of the quilting.
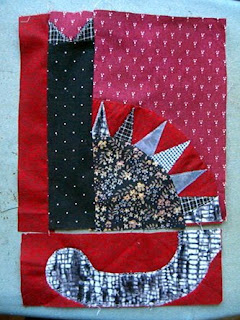
Then pin and handstitch the curved edges. After you have that rectangle, add the cat's body, and then the bit of background to the left.
Fuse the tail to the bottom, and stitch the bottom rectangle to the top.
I finished both the cat quiltlets with a "pillowcase" finish, sewing the front back right sides together, and including the wadding at that point (spraybasted to the front so it would stay in place when the quiltlet was turned right side out). I drew around a piece of A4 paper with a ballpoint pen, on the inside of the backing, and machined just inside that line, taking a stitch diagonally at each corner.
The backing has a strip of fusible at the top, on what will be the inside -- so that after you've slashed the backing (through the middle of this strip) and turned the quilt right side out, you can "repair" the slash by butting the raw edges and ironing the backing down. (It's a good idea to press the sides before ironing down the slash area.) You can put the hanging sleeve over the slash, if you're adding a sleeve.
 Most of the quilting is "in the ditch" -
 Now, the cat on the right, with the skinny tail. It has a border, so the actual cat is a bit smaller.
 To make the pattern get some plates of suitable sizes - 
 I'm in two minds about the tail - you might want to leave it out altogether, perhaps replacing it with the proverbial Mat.
 If you want to be fussy about the sawtooth bits, you can use the folded arc to draw a window to preview your fabric. Extra fabric below the "tooth" goes into the seam and gets covered.
 Assembly is as above, but with borders around one or more sides. A binding would look good, if pillowcase finish doesn't appeal.

and a ruler for the straight bits - the exact proportions aren't crucial - cats come in various sizes!
I'm in two minds about the tail - you might want to leave it out altogether, perhaps replacing it with the proverbial Mat. If you want to be fussy about the sawtooth bits, you can use the folded arc to draw a window to preview your fabric. Extra fabric below the "tooth" goes into the seam and gets covered.
 Assembly is as above, but with borders around one or more sides. A binding would look good, if pillowcase finish doesn't appeal.
Both these quiltlets are done completely on the machine, but could of course be handstitched.
Subscribe to:
Posts (Atom)