First, trim your quiltlet to the desired size (I use an A4 piece of paper for a template). It's helpful to have a firm, trim, straight edge. You might want to stay-stitch near the edge.
Cut a binding strip, on the straight grain, 1 - 1/4" wide. If you need joins, make the seams on the bias.
Start sewing somewhere on the long edge, and about 2" along from the end of the strip.
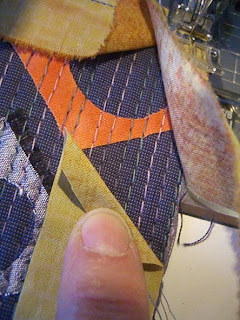
It took me a while to find the 1/4" point on the foot -- it's the dot on the right -- and even longer to realise that as well as guiding the 1/4" seam it also shows 1/4" forward from the needle. If your foot doesn't have a 1/4" point like this, you can cut a strip of card 1/4" wide and use it to measure the distance from the bottom edge. (The pin indicates the edge underneath the binding strip.)
 When you get to 1/4" from the edge you need to stop sewing; either sew backward a few stitches, or, as in this excellent tutorial, turn the fabric 90 degrees and stitch off the edge.
 No need to cut the threads, just lengthen them till you can manoeuvre the fabric. Lay the binding strip at a 90 degree angle and get ready to reinsert the needle 1/4" from each edge.
 Again, either backstitch, or stitch to the point where the fabric folds at an angle underneath
You can see the nice little mitre that forms all by itself when you turn back the binding - But before turning the binding back (and sewing it down on the back) you have to close up the binding strip.
You can simply fold one end back and stitch the other over it - the square join is hardly noticeable. But if you want to do a svelte bias join, this picture may be worth a thousand words -
 But before turning the binding back (and sewing it down on the back) you have to close up the binding strip.
You can simply fold one end back and stitch the other over it - the square join is hardly noticeable. But if you want to do a svelte bias join, this picture may be worth a thousand words -

Cut and fold back the underneath binding; cut the top binding and lay it over and stitch it down. I stretch the final 1/2" or so into the seam (and trim off the point), to help it lie flatter.

Like the mitre on the front, the mitre on the back practically makes itself - well, with a bit of help from a couple of pins to hold the fabric in place, and a nice 45 degree crease pressed in with the fingers -

Here it is -

And here's the nice little join, pinned ready for stitching down (by hand). If you make the binding strip wider, you could sew it down by machine -- stitch in the ditch from the front, having pinned the back down carefully, beyond the seam allowance.
 If you make the binding strip wider, you could sew it down by machine -- stitch in the ditch from the front, having pinned the back down carefully, beyond the seam allowance.
The finished binding, showing bias-joined strip at the top and the overlapped ends at the side.
 Once you've done this once or twice, it will be easy-peasy and second nature.
 Once you've done this once or twice, it will be easy-peasy and second nature.
No comments:
Post a Comment